How to Replace the Shaft Seal on a Pentair WhisperFlo or IntelliFlo Pump: Step-by-Step DIY Guide
When your Pentair WhisperFlo or IntelliFlo pump starts leaking water from the front seal area, it's time to replace the shaft seal. While this might seem intimidating, it's actually one of the most manageable pump repairs for Arizona pool owners willing to get their hands dirty. With the right tools, patience, and our step-by-step guide, you can save hundreds of dollars on professional repair costs.
Whether you're in Queen Creek dealing with hard water deposits or in Gilbert fighting the constant battle against dust and debris, a leaking pump seal is a common issue in our desert climate. The good news? This repair typically takes 2-3 hours and costs under $50 in parts.
Why Shaft Seals Fail in Arizona
Arizona's extreme heat, hard water, and seasonal temperature swings create the perfect storm for seal failure. When temperatures in Mesa and Chandler regularly hit 115°F, the constant expansion and contraction of metal components puts extra stress on rubber seals. Add our notoriously hard water, and those seals don't stand a chance.
Tools and Materials You'll Need
Before starting, gather everything you'll need. Nothing's more frustrating than being halfway through a repair and realizing you're missing a crucial tool.
Essential Tools:
- 1/2" wrench (for holding motor shaft)
- 9/16" wrench (for seal plate bolts)
- 5/8" socket and ratchet
- Phillips head screwdriver
- Flat blade screwdriver
- Allen key set
- Rubber mallet
- Channel lock pliers
- Strap wrench (optional, but helpful for stubborn impellers)
- Complete seal replacement kit (includes shaft seal, seal plate gasket, impeller screw washer, and O-rings)
- Silicone sealant
- Anti-seize compound or marine grease
- Lint-free cloths
- Denatured alcohol
- Paper towels
- Damaged threads on the impeller or motor shaft
- Cracked or warped seal plates
- Seized components that won't budge
- Uncertainty about part compatibility
- Keep your pool water properly balanced (especially important with our hard water)
- Run your pump during cooler hours when possible
- Perform regular cleaning to prevent debris buildup
- Monitor for early signs of leaking
Materials:
Pro Tip: Complete Aquatic Solutions' DIY Portal has detailed parts diagrams and compatibility charts to ensure you order the right seal kit for your specific pump model.
Safety First: Power and Water
Before touching anything, turn off power to the pump at both the timer/control panel AND the circuit breaker. Double-check with a voltage tester if you have one. Pool pumps in San Tan Valley and surrounding areas typically run on 230V: enough to seriously hurt you.
Next, drain the pump completely. Locate the drain plugs (usually two) on the pump housing and remove them. Let all water drain out before proceeding.
Step-by-Step Seal Replacement
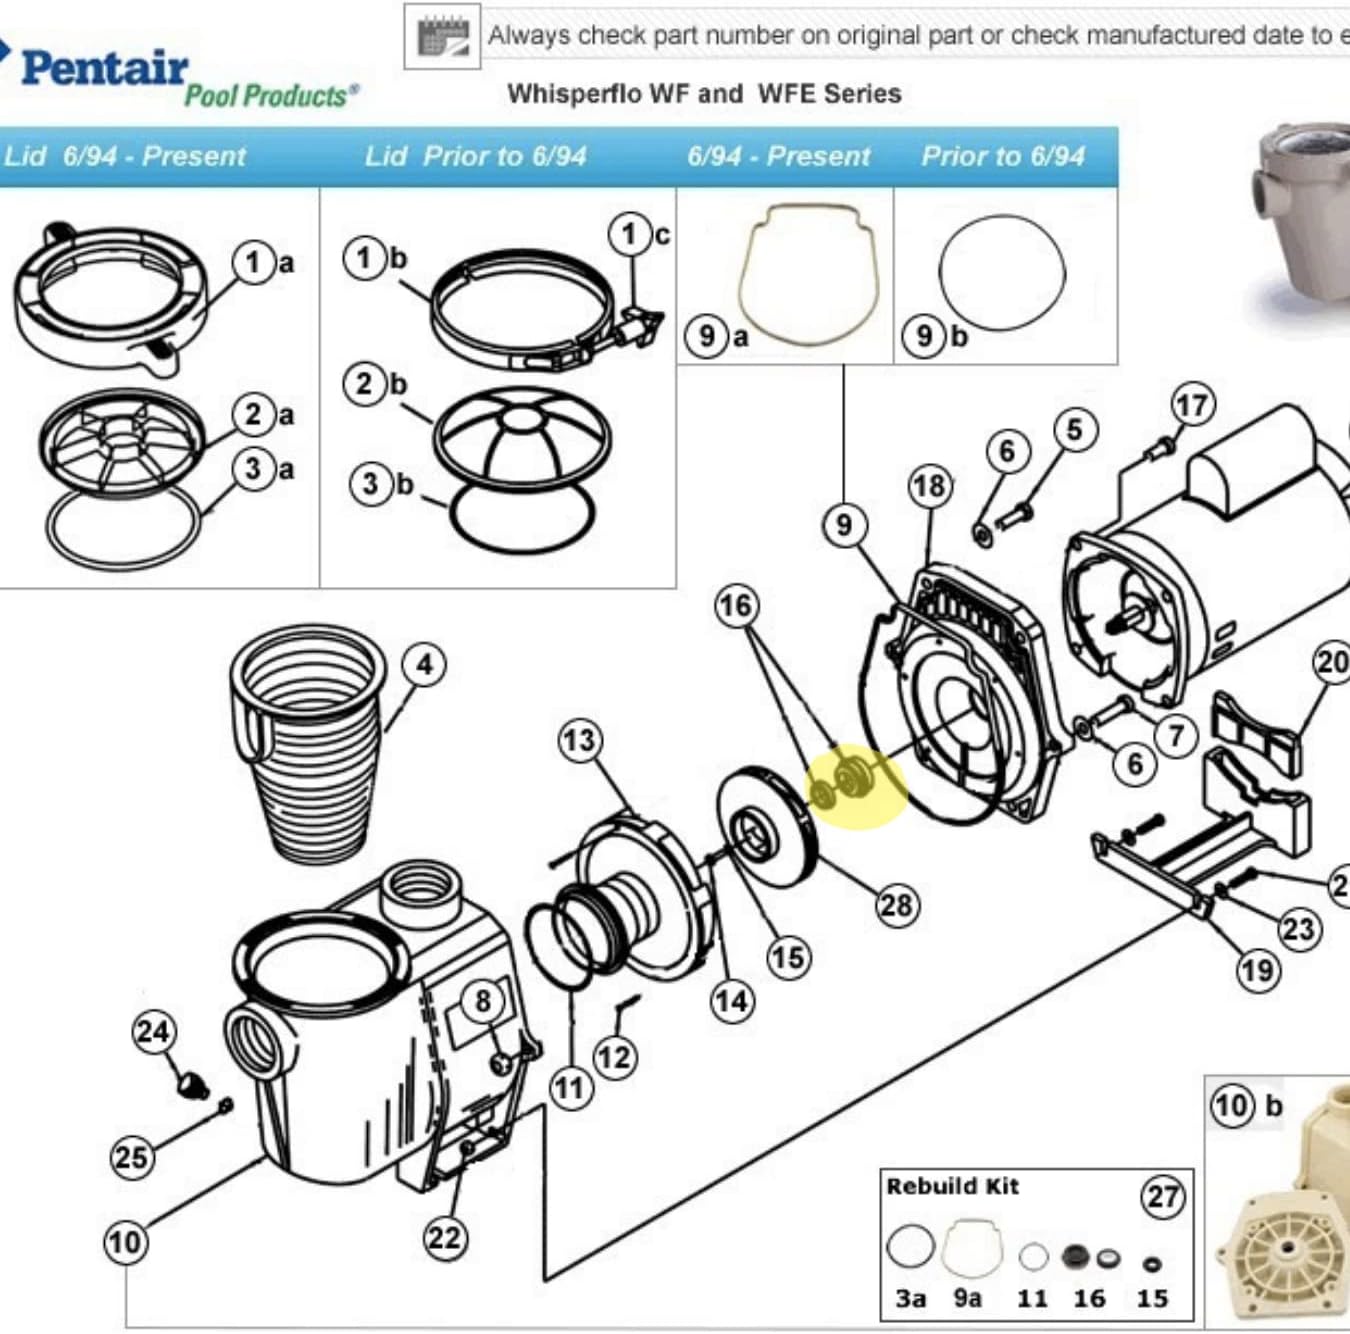 _Pentair Whisperflo exploded view—helpful for identifying each part and planning your repair._
Step 1: Remove the Motor Assembly
Start by loosening the six bolts that connect the wet end to the motor. These bolts secure the entire motor assembly to the pump housing. Once loose, carefully slide the motor straight back and out of the housing. It's heavier than it looks, so get a good grip.
Step 2: Access the Impeller
The impeller sits behind the diffuser (the plastic housing with vanes). Remove the diffuser by loosening its mounting bolts. Some models have a twist-lock design: turn counterclockwise to remove. Set the diffuser aside in a safe place where it won't get damaged.
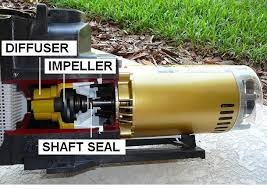 _Visual guide to the key parts of your pool pump: understanding the shaft seal’s location._
Step 3: Remove the Impeller Lock Screw
Here's where many DIYers get tripped up: the impeller lock screw has reverse threads. This means you turn it clockwise to loosen it. Use your Phillips screwdriver while holding the motor shaft steady with your 1/2" wrench from the back of the motor. This prevents the shaft from spinning while you work.
Step 4: Remove the Impeller
Hold the motor shaft steady and turn the impeller counterclockwise to unthread it. If it's stuck (common in hard water areas like Gilbert and Chandler), use a strap wrench for extra grip. Work slowly and steadily: forced movements can damage threads.
Step 5: Remove Old Seals
Now you'll see two seals that need replacement:
Impeller Seal: Use a flat screwdriver to carefully pry out the seal from the impeller. Work around the circumference, being careful not to gouge the seal seat. Also remove the steel washer and any O-rings.
Seal Plate: Remove the four 9/16" bolts securing the seal plate to the motor. Slide the plate off the shaft, then use a 5/8" socket to drive out the old seal from the plate.
Step 6: Clean Everything Thoroughly
This step is critical for Arizona pool owners. Our hard water leaves mineral deposits on everything. Clean all sealing surfaces with denatured alcohol and lint-free cloths. Any contamination: oil, dirt, or mineral buildup: will cause your new seals to fail quickly.
Virtual Agent Tip: If you're unsure about the condition of any components, our Virtual Agent can help you assess them via video call. Sometimes what looks like normal wear is actually a sign of a bigger problem.
Installing New Seals
Step 7: Install Seal Plate Seal
Press the new seal into the seal plate using a PVC coupling or deep socket that fits over the seal. The seal should sit flush and even. Apply a thin bead of silicone sealant around the seal as specified in your kit instructions.
Step 8: Reinstall Seal Plate
Once the silicone has set (follow manufacturer's timing), slide the motor shaft through the seal and bolt the plate back to the motor. Apply anti-seize to the bolt threads and tighten in a criss-cross pattern to prevent warping.
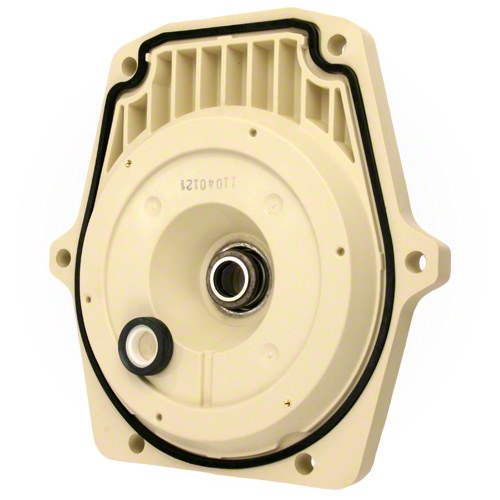 _Replace worn seal plates for leak-free operation._
Step 9: Install Impeller Seal
Similar to the seal plate, press the new seal into the impeller using appropriate-sized tooling. Ensure it sits completely flush: any high spots will cause leaks.
Step 10: Reassemble Everything
Thread the impeller back onto the shaft (clockwise) and hand-tighten. Install the new O-ring in the impeller groove, then reinstall the locking screw (remember: left-hand threads, so turn counterclockwise to tighten).
Reattach the diffuser and all bolts. Start with center bolts to ensure proper alignment, then work outward in a star pattern.
Testing Your Work
Before reassembling the motor into the housing, do a quick visual inspection. Everything should be clean, properly seated, and free of debris.
Slide the motor assembly back into the pump housing and secure with the six mounting bolts. Close the drain plugs and slowly fill the pump with water. Prime the system according to your pump's instructions, then start it up and watch for leaks.
When to Call for Backup
Even experienced DIYers sometimes run into issues. If you encounter:
Our Virtual Agent Portal provides real-time video support. Connect with a certified technician who can guide you through tricky steps or help you determine if professional intervention is needed.
Maintenance Tips for Arizona Pools
In our desert climate, shaft seals typically last 2-3 years with proper maintenance. To extend seal life:
Pool owners in Queen Creek, Mesa, and surrounding areas who stay on top of basic maintenance can often double their seal life. The key is catching small issues before they become big problems.
Wrapping Up
Replacing a shaft seal on your Pentair pump isn't rocket science, but it does require patience and attention to detail. Take your time, keep everything clean, and don't hesitate to reach out for help when you need it. Our DIY resources and Virtual Agent support are designed to help Arizona pool owners tackle these repairs confidently and successfully.
Remember: even if you save just one service call, this DIY repair has likely paid for itself. Plus, you'll have the satisfaction of knowing you can handle one of the most common pool pump repairs yourself.
For more DIY guides, troubleshooting tips, and expert support, visit our DIY portal or check out our complete pool maintenance resources.